Mosquito nets are an essential addition to any home, providing a barrier against insects and enhancing the comfort and safety of your living space. Installing window mosquito nets can seem daunting, but with the right guidance, it can be a straightforward DIY project. This article provides a comprehensive guide on how to install window mosquito nets in five easy steps, ensuring a secure and effective setup.
1. Gathering the Necessary Materials
Before you begin the installation process, it’s important to gather all the necessary materials. This includes the mosquito netting, self-adhesive hook-and-loop tape or magnetic strips, a measuring tape, scissors, and a utility knife. Having these items on hand will streamline the installation process and prevent interruptions.
Start by measuring the dimensions of your window. Accurate measurements are crucial to ensure that the mosquito net fits perfectly and provides maximum protection. Use a measuring tape to measure the height and width of the window frame. Record these measurements carefully, as they will guide you in cutting the mosquito netting to the appropriate size.
Next, choose the type of mosquito netting and attachment method. There are various options available, including polyester nets, fiberglass nets, and nets with magnetic strips. Self-adhesive hook-and-loop tape is a popular choice for its ease of use, while magnetic strips offer a seamless and secure fit. Select the option that best suits your needs and preferences.
2. Preparing the Window Frame
Once you have gathered your materials and measured the window, the next step is to prepare the window frame. This involves cleaning the surface to ensure the adhesive sticks properly. Use a damp cloth or cleaning solution to wipe down the frame, removing any dirt, dust, or grease. Allow the frame to dry completely before proceeding.
Proper preparation of the window frame is essential for a secure installation. Any residue or moisture left on the surface can compromise the adhesive’s effectiveness, leading to a poor fit or the net coming loose over time. Take your time to ensure the frame is clean and dry, as this will contribute to the longevity and effectiveness of the mosquito net.
If you are using magnetic strips, ensure that the window frame is metal or has a metal surface where the magnets can attach. If not, you may need to use self-adhesive magnetic tape or an alternative attachment method. Preparing the window frame correctly sets the foundation for a successful installation and ensures the mosquito net remains in place.
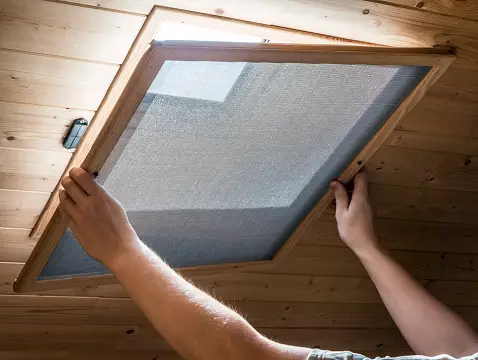
3. Cutting and Attaching the Mosquito Net
With the window frame prepared, the next step is to cut the mosquito netting to the required size. Lay the netting flat on a clean surface and use the measurements you recorded earlier to mark the dimensions. Add an extra inch to each side to ensure full coverage and a secure fit. Use scissors or a utility knife to cut the netting along the marked lines.
Once the netting is cut to size, attach the hook-and-loop tape or magnetic strips to the edges of the net. If using hook-and-loop tape, apply the adhesive side to the edges of the netting, pressing firmly to ensure it sticks. For magnetic strips, attach them along the edges of the net, ensuring they align with the metal frame of the window.
After attaching the adhesive strips or magnets to the net, it’s time to fix the netting to the window frame. Start at one corner and gradually work your way around, pressing the net firmly against the frame. Ensure that the netting is stretched taut and there are no gaps or sagging sections. This step requires patience and precision to achieve a snug and secure fit.
4. Securing and Adjusting the Net
Once the mosquito net is attached to the window frame, it’s important to secure it properly and make any necessary adjustments. Check the entire perimeter of the net to ensure it is firmly attached and there are no loose areas. Press down on the adhesive strips or magnetic sections to reinforce the attachment.
If you notice any gaps or loose areas, adjust the netting by peeling back the adhesive strips or magnets and repositioning them. Smooth out any wrinkles or folds in the netting to ensure a clean and tight fit. This step is crucial to ensure that no insects can enter through gaps or loose sections.
Additionally, consider adding extra support to the corners and edges of the net. You can use additional adhesive strips, tacks, or clips to reinforce these areas and prevent the net from coming loose over time. Properly securing and adjusting the net ensures long-lasting protection and peace of mind.
5. Testing and Maintenance
After securing the mosquito net, the final step is to test its effectiveness and perform regular maintenance. Open and close the window to ensure the net does not interfere with its operation. Check for any gaps or loose sections that may have been overlooked during installation.
It’s important to perform regular maintenance to keep the mosquito net in good condition. Clean the net periodically to remove dust and debris, and inspect the adhesive strips or magnets for wear and tear. Replace any damaged or worn-out sections to maintain the net’s effectiveness.
Regularly check the net for any signs of damage, such as tears or holes, and repair them promptly. By performing routine maintenance, you can extend the lifespan of the mosquito net and ensure it continues to provide effective protection. Proper testing and maintenance are key to ensuring the long-term success of your DIY installation.
Conclusion
Installing window mosquito nets is a practical and straightforward DIY project that can enhance the comfort and safety of your home. By following these five easy steps—gathering materials, preparing the window frame, cutting and attaching the net, securing and adjusting it, and performing regular maintenance—you can ensure a secure and effective installation. With the right materials and careful attention to detail, you can create a mosquito-free environment and enjoy a more comfortable living space.